Ask the Expert: How do I improve my plasma cutting results?
Question: How do I improve my plasma cutting results?
Answer:
1. Know what a good cut looks like
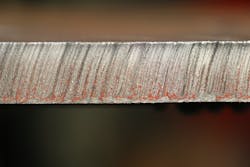
A good cut has fine, consistent, and parallel draglines from top to bottom. The lines may be perpendicular or angled by about 15 degrees, with the variability caused by travel speed and torch angle.
A good cut also has a square top edge, no top splatter, and very little dross on the bottom of the cut. Dross results from metal that melted and re-solidified instead of being ejected by the force of the plasma jet.
2. Have a proper grip on the torch
For cutting with an exposed tip, hold the torch 1/16" to 1/8" over the top of the workpiece (or use shield cap that provides a built-in standoff). Brace yourself properly and practice tracing the cut path to ensure you can move freely. A torch with a consumables design that offers a clear view of the cut path can help.
3. Understand how to judge travel speed
Proper travel speed causes the plasma jet to exit the bottom of the workpiece at a 5- to a 15-degree angle. Moving too quickly doesn’t give the arc time to penetrate the plate. Below the plate, sparks will shoot out at an extreme angle, as evidenced by J-shaped draglines. Moving too slowly causes the arc to “over-burn” the kerf (cut width), causing fit-up issues.
4. Learn how to achieve a drop cut
Focus on rolling the torch at the beginning and end of the cut. Position the torch over the top edge of the plate but point it at the 7 o’clock position; trigger the arc and roll the torch so it’s straight up and down. Pause for a second on the edge of the plate, then move forward. The roll ensures you sever the top edge of the plate and the pause ensures you penetrate through to the bottom.
Exiting the cut requires a reverse of the technique. When the top torch of the torch has reached the end of the plate, remember that the plasma jet is lagging by 5 to 15 degrees. If you’ve been using a slight drag angle to the torch, roll the torch to a perpendicular position and pause for a moment to allow the plasma jet to catch up. Finish the cut by rolling the torch toward the 3 o’clock position to sever the top corner for a clean drop cut.
Information provided by ESAB Welding and Cutting


