One critical step in the pre-trip inspection is to make sure your air brakes are in good operating order before hitting the road. As a student preparing for the pre-trip inspection portion of the CDL test, I need to know the proper procedure for conducting this test. There are four steps to take to ensure all areas of the air braking system are working properly.
(Read more about the entire pre-trip inspection process in a previous blog post here.)
The LABS test
The LABS test is a method for remembering all the steps to testing the air brake system on a commercial vehicle, which should be done during a pre-trip inspection. LABS stands for Leaks, Alarms, Buttons, and Service Brake. It allows you to confirm the following (these tests are conducted in order):
Leaks - after the wheels are chocked, and the air pressure built up to between 90-125 psi, the driver should leave the vehicle in neutral and cut the engine. Then, turn the key to the "on" position. (Some vehicle alarms will not work unless the vehicle's auxiliary power is available.) The next step is to press in the tractor (and trailer, if applicable) parking brake to release it. After the initial pressure drop, the driver then engages the brake pedal at a steady pressure for 60 seconds. The air pressure cannot drop more than 3 psi for a tractor, and no more than 4 psi for a combination vehicle (aka, tractor with a coupled trailer).
Alarms - You then must confirm the alarms work to alert drivers of a drop in air pressure. To do this, you must apply and release pressure on the foot brake until the audible or visual alarm alerts to a drop in pressure to no more than 60 psi.
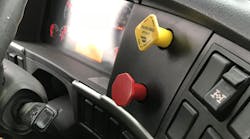
Buttons - This test confirms the tractor (and trailer, when applicable) parking brakes are in working order. To do this, the driver must continue to apply and release pressure on the foot brake until the parking brake knob(s) pop out. This must happen before pressure drops to 20 psi, to ensure the failsafe is in proper working order.
Service brakes - Before conducting this test, the driver can grab the wheel chocks. The last portion of the test requires the driver to build up air pressure again to 120-125 psi, in order to test the service brakes. Once pressure is built, place the vehicle in a low gear and release the clutch and brake to move forward at about 5 mph. We’re taught to hover our hands at the 10 o’clock and 2 o’clock positions while the vehicle moves forward. Once the vehicle is in motion, you should push in the clutch pedal and brake pedal. If the wheel jerks to either side when applying pressure to the brakes, it indicates that side of the vehicle may have a brake issue. If not, you can confirm the service brakes are in proper working order.
One of the instructors at WCTC taught me that every part of the LABS test should be conducted with the driver keeping his or her hands on the wheel the entire time. This ensures you do NOT touch the tractor or trailer parking brake during the test. If you do touch the buttons during the CDL pre-trip test, you will have to start the entire LABS test again from the beginning.
...
In the Driver’s Seat is a blog series from Fleet Maintenance Editor-in-Chief Erica Schueller. The series covers the process of attending a formalized technical training professional truck driving program in order to obtain a Class A commercial vehicle driver’s license.


