More and more commercial vehicles are transporting goods across North America with truck drivers logging billions of miles annually. With more commercial vehicles on the road, it is ever more critical to properly maintain wheel ends in order to help avoid the potential of catastrophic wheel offs.
It is important to periodically inspect a vehicle’s wheel ends to ensure safety and maximize over-the-road performance. Inspection will help determine if a wheel end repair is necessary. Manufacturers can vary on their recommendations of a detailed inspection, from every 50,000 miles or every six months to 100,000 miles or every 12 months, or more.
Before performing an inspection, always follow the manufacturer’s safety guidelines.
It is highly recommended to wear eye protection to avoid serious eye injury, and protective clothing as needed.
The components of a wheel end system
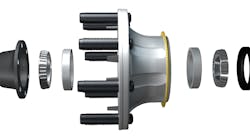
A typical wheel end system consists of a seal, an inboard and outboard tapered bearing and a hubcap. Additional components include a spindle nut and wheel nuts. Some wheel end systems may also contain a spacer that is meant to provide preset torqueing. Each component plays a vital role in protecting the wheel end as well as the operator (See Fig. 1).
The seal may be one of the more critical components in the system, as it is meant to keep the oil or grease in the hub unit and contaminants from getting into the hub. This keeps the bearings properly lubricated and protects the bearings from premature failure.
The tapered bearings consist of a cup, cage, rollers and an inner race. The bearings are meant to provide operational reliability under heavy loads and misaligned conditions. Additionally, tapered bearings are meant to handle a combination of radial and thrust loads.
The hubcap keeps the oil or grease in the wheel hub, maintaining sufficient lubrication to the bearings. Hubcaps also may include additional features such as a site window, a center fill plug and a side fill plug (some of which may contain a magnet to check for any metal wear).
Additional components of a wheel end include the spindle nut and wheel nuts. There are varying spindle nut styles, including but not limited to a standard nut system, a stamped nut system, a castle nut system and a double nut system. The use of these spindle end components varies by truck or trailer manufacturer.
The wheel nut is designed to provide clamp force while maintaining optimized torque/tension, reducing operating costs with extended life and improved fuel economy. Selecting the proper wheel nut can help reduce the potential of catastrophic failure, as loosened wheel nuts can result in wheel-off conditions as well as reduce the operating life of the wheel end’s seals and bearings.
Common causes of wheel off conditions
There are two common causes of wheel-offs: loss of clamping force on the wheels and bearing failure.
Typically, loss of clamping force is a result of improper installation, such as improper torque or products not meeting the minimum torque requirements set by the OE manufacturer. If there is not enough torque or a technician over-torques, the studs can become overstretched and can fail over the life of the wheel end.
Proper care and maintenance of the bearings also is critical to avoiding wheel off conditions. Cleaning the bearing in a solvent bath is important to remove foreign materials. Making sure the bearings are clean will help extend wheel end life after re-installation.
Recommendations for proper wheel end inspection
It is important to inspect a vehicle’s wheel ends periodically for safety and to maximize over-the-road performance. Recommendations can vary by manufacturer, some as little as 50,000 miles or every six months, to every 100,000 miles or every 12 months.
To prepare the vehicle for inspection, first put the vehicle in park and block the wheels to prevent the vehicle from rolling. Then, raise the axle until the tires are off the floor and make sure that the vehicle is properly supported with safety stands.
It is very important to note service technicians should never work under a unit supported by only a jack. If the axle is supported with spring brake chambers, following the manufacturer’s instructions, carefully compress and lock the springs to completely release the brake.
Next, using a proper hub support, remove the spindle nut, outer bearing (and spacer if it is a PreSet system) and pull the hub assembly off the spindle. It is recommended to check for the following when inspecting a spindle and hub:
- Spindle and spindle threads
Inspect the spindle and spindle threads for damage, and remove light fret.
Also check for spalling (wearing away of the surface), corrosion pits, discoloration from overheating, punch marks/chisel marks, weld beads and upset metal. It is important to note damaged threads can be repaired using a pitch thread file or die nut.
- Fastener, lock nut and bearing adjustment nut and washer
The use of these spindle end components varies by truck or trailer manufacturer. Inspect the fastener, lock nut, bearing adjustment nut and washer. Look for chisel marks or other deformation as a sign of improper installation, or an attempt to make temporary repairs.
- Bearing inspection
Inspect bearings for pitting, rust or corrosion and spalling. Replace the bearings if any of these conditions exist.
- Seal inspection
When idle for an extended period of time, the upper half of the seal and bearing do not have contact with the lubricant. Seal rubber will dry out and become stiff, losing its ability to seal. Always replace the seals before putting a vehicle back in service.
- Lubricant inspection
Inspect lubricant for presence of hard particle contaminants and water contaminants (e.g. milky appearance or discoloration). Thoroughly clean the hub and spindle and inspect for signs of corrosion. Be sure to service the hub as needed, including replace bearings, refill new lubricant to proper levels with manufacturer’s specified lubricant (do not mix lubricants) and repack lubrication to manufacturer’s specifications (if providing maintenance for a greased wheel end).
- Hubcap inspection
When inspecting a hubcap, be sure to inspect the window for opaqueness, and that the center fill plug is pliable and the vent is clear of contaminants. Then inspect the side fill plug (if applicable) and the flange for flatness.
- Hub inspection
Finally, inspect the inside and outside of the hub. Look for broken fasteners and bolts, cracks in the housing and damage to the hub and bore. If the bearing cup is loose in the hub, it could indicate a serious condition with the hub, which means the hub must be replaced.
General best practices for safe and efficient wheel end maintenance
Care in handling components and proper tooling are always critical factors in all procedures, which leads to successful wheel end maintenance.
There are two main types of serviceable wheel hub assemblies: manually adjusted and pre-adjusted. The re-assembly instructions are different for both so be sure to follow the correct procedure for each wheel end type.
A pre-adjusted hub assembly will include a spacer between the inner and outer bearings. The bearings are specially tolerenced in order to achieve the targeted adjustment setting.
Bearing installation is handled differently depending on whether a service technician is working with a ferrous hub or an aluminum hub. With either hub, never directly hammer on the bearing.
For ferrous hubs, use the proper tool to install the bearing cups into the hub. For aluminum hubs, heat the hub in boiling water or in an oven to no more than 300 degrees F. Do not use localized heat. Chill the bearing cup in a freezer. The hub will expand and the cup will contract. Place the cup into the hub.


