5 battery testing basics you should know
Batteries are a wear item. That’s a fact. Whether you purchase a budget battery or the most advanced AGM battery, at some point it will fail. Whether you live in Phoenix and experience extreme heat much of the year, Grand Forks, North Dakota and experience extreme cold, or in San Diego and have weather most of us would trade for in a minute, your battery is going to die (hint: it will last longer, all things being equal, in San Diego). This makes battery testing critical for vehicular happiness, whether you are a vehicle owner hoping to avoid a future no-start situation or a shop trying to provide the best possible service to your customers.
Read more: Expert tips to speed up and streamline electrical repairs
Battery testing doesn’t have to be overly complicated or difficult, especially if you keep in mind a handful of guiding principles that will allow you to get the most accurate and predictive result. Batteries are relatively predictable and (usually) behave according to a pattern tied to their lifecycle. That said, there are always twists and turns if you test enough batteries in enough vehicles. So, as is true for almost any aspect of vehicle repair and maintenance, deploying a repeatable, logical diagnostic strategy is critical. Below, we’ll suggest a few components of such a strategy.
1. The connection is critical
A theme you will hear expressed a lot in this article is that accuracy comes from making good decisions and putting in the effort, and nowhere is that more true than when it comes to making a good connection. This has many implications but is most obvious when testing a battery installed in a vehicle. Sometimes, the battery posts are easily accessible despite the vehicle connections, but often they are not. If the battery’s terminals are obstructed by harnesses and other connectors, it is worth the effort (and hassle) to remove those connections to provide proper access to the battery terminals. This can make a huge difference in the results you receive since those harnesses can (and often do) add resistance, which your tester sees as inside the battery. If you must test through the harness or other hardware, make sure it is tightened properly on the battery posts and that there are no signs of battery corrosion or rust in the connection – this is not ideal, but much better than testing through loose or corroded connections.
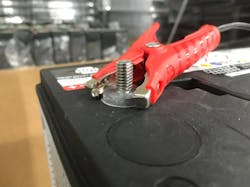
In addition, it is important to review the battery design and factor for that specific design when planning your testing regimen. A great example is a battery designed with a terminal composed of a lead base with a steel threaded stud protruding above (see image above). This one can be tricky. You’d think, connect to that threaded stud and you’re good to go. Not so fast. Connecting to the lead base (which isn’t always easy) yields a much more accurate read on the battery’s condition. This sort of makes sense – harnesses and other connectors are typically flat and secured/smashed against that lead base, so the connection isn’t really with the stud but with the base.
2. State of charge matters
A battery’s state of charge (SoC) can and will impact your testing regimen and results. First, there’s the surface charge. Surface charge, if we get down to the chemical definition can be relatively complicated, but in this case, we are referring to excess voltage typically found in a recently charged battery. If you attempt to test a recently charged battery, you might find that its open circuit voltage (OCV) is 13.05V, 13.12V, or higher. Since your lead acid battery is fully charged at 12.6V or 12.8V, depending on its construction, the excess voltage represents surface charge.
But, surface charge can cause issues in the testing process, depending on the testing method used. If using an invasive load tester, the surface charge is not a big concern, because the testing process will pull down that surface charge almost immediately. If using an electronic tester, it is best to relieve the battery’s surface charge by adding a load to the battery, such as turning on the high beams for 15 seconds. This will stabilize the battery, allowing you to get a more accurate assessment of battery health and reduce the likelihood of a “charge and retest” result.
What about low SoC batteries, do they also need special handling? Again, it’s a yes and no, but this time in the opposite direction. For invasive load testing to be accurate, the tested battery needs to be at or above 85 percent SoC when tested. If it is below this level, which is likely, considering that problem batteries are what get tested the most, it must be charged prior to testing. This takes time, potentially slowing down the diagnosis and eventual repair, but it is absolutely necessary to achieve an accurate result. One of the great benefits of digital testing is that you can accurately test a discharged battery. Of course, there are limits to this. For instance, even though our BA327 can read batteries down to 1.5V, we’d suggest charging a 12V battery prior to testing if it is below 7-8V.
3. Testing batteries over time
All batteries have a certain level of internal resistance, since their internal components are not perfect conductors of electricity. For instance, a battery’s electrodes and electrolytes are not 100 percent conductive. So, each new battery starts out with a natural level of internal resistance. This resistance will increase as a battery ages, due to the natural chemical process that takes place within all lead acid batteries.
Monitoring and tracking the internal resistance of a battery can be very useful in assessing where that battery is in its lifecycle. Granted, this usefulness only applies to vehicles and batteries that you will see repeatedly over time. So, for service operations that might see a vehicle for service one time or only sporadically, this aspect of battery assessment is not helpful. But, for captive fleets and other service operations, as well as vehicle owners, using battery internal resistance as a predictive tool can be very beneficial. It can essentially eliminate equipment downtime before it strikes, which has tremendous value for fleets and other captive service environments.
4. Testing every vehicle boosts revenue
If you are running a shop, the battery tester can be one of your most valuable tools, with a massive return on investment. The trick is, you have to use it to get that return. First, using your tester on every vehicle that enters your service bays improves customer satisfaction. You are able to advise customers about the state of their electrical system and warn them if they have a potential problem. It is just one more way for you and your team to earn the role of trusted advisor. Second, using your tester drives revenue. There are many vehicles rolling around with batteries that are approaching end of life. In addition, many vehicles have problems with a rotating electrical component, such as a faulty starter. Finally, your tester can help to identify problems with belts and battery cables. These items potentially add revenue to each service ticket while helping your customers – win/win! But, these items and issues might go undetected if you aren’t using a quality battery testing tool consistently on every vehicle that enters your shop.
5. What testing method is most effective?
This is really a trick question since there is no “best” testing method. Ultimately, the best testing method is the one that a.) you are most comfortable with, b.) best meets your workflow, and c.) you are going to use. There are essentially two approaches, without getting into more complex methods, such as using a scope, etc. The two main camps are digital testing and invasive load testing. There are pros and cons to both methods, which are worth exploring as you develop your testing regimen.
Digital testing
Electronic/digital testing usually involves a variant of passing a signal through the tested battery and reading the response of that signal (more on our approach below). This method has many benefits, one of the most significant of which is that you can use this method to accurately test a discharged battery. Another benefit is that it has the ability to dial its testing process in to match the battery type being tested, assuming that you are using a quality testing solution. This means that an AGM flat plate (traditionally shaped) battery can be tested/judged differently than an AGM spiral wound battery – side note: when going the digital route, if your digital tester doesn’t distinguish between these battery types, you should be concerned. Another benefit is that digital testing opens the door to a much more detailed analysis of system performance than can be achieved by an invasive tester. When performing a starting system test, for example, you get a specific level that the system voltage dropped to versus watching a needle deflection in the blink of an eye. So, you get 10.2V rather than seeing the needle dip to about 10V. Often, that level of detail is important and useful. Of course, you can get that with your DIMM, but now, you’re grabbing two tools.
Invasive testing
Invasive testing involves placing a fixed or variable load on the battery for a specific period of time and monitoring the battery’s reaction to that load, as in, “Can it hold the load or not?” Although this is a more simplistic approach, it is also fundamentally reliable. Proponents of this approach will say that’s all that matters – either the battery holds the load or it doesn’t. For most professional applications, a carbon pile (variable load) tester is the most appropriate choice since it allows the operator to dial the load in accordingly to the battery’s rating. The Battery Council International Standard is 50 percent of the battery’s rated CCA, so for a 600 CCA rated battery, you would load it to 300A for 15 seconds and follow the assessment provided by the tester. Is the needle holding steady in the green? The battery is good. Is the needle dropping or steady in the red? The battery is bad. Simple and straightforward.
So, where does this leave us? Well, if you’re a vehicle owner with a variety of vehicles and other toys in your stable, we’d recommend a small, quality digital tester, such as our SOLAR BA9. It is quick, accurate, easy to use and versatile. If you’re a pro… well, there are many options, but most advanced diagnostic technicians and leading shops would suggest using both methods. The reality is that there’s always that one weird battery that can fool either method. There’s also the fact that newer battery types, such as AGM and spiral wound batteries, don’t die on a straight line like traditional flooded batteries do. If you’ve had a driver’s license for decades, when you learned to drive, you learned to recognize the sound of a battery reaching end of life. The starting event got dragged out and sounded awful and you knew it was time to head to Sears or your local repair shop to address your obviously weak battery. That’s not how it typically works with AGM, spiral wound, and other newer battery types. Now, a typical customer complaint is, “On Tuesday, it was cold and the car started right up, but on Thursday, the car wouldn’t start at all.” So, many technicians suggest testing using both methods if there’s any reason to suspect the battery is a problem, using both a digital option and a carbon pile tester.
This article was originally published on VehicleServicePros.coms.
About the Author

Jim O' Hara
Clore Automotive
Jim O'Hara has over 15 years experience in the Tool and Equipment industry, including 10+ years at Clore Automotive. At Clore, he heads up the marketing team and is directly involved in the development of new products and enhancements of existing products.


